Technical Tip
2.8 Feature
If your company uses Ventyx or B2Be software to place purchase orders with suppliers, you also use this tab to enter the supplier's Ventyx / B2Be details.
You can set up specific formats for individual suppliers which need to have their purchase orders laid out in a particular way. Formats must first be created using the Micronet Report Generator (see "Reports - Report Generator").
|
|
|
Technical Tip 2.8 Feature If your company uses Ventyx or B2Be software to place purchase orders with suppliers, you also use this tab to enter the supplier's Ventyx / B2Be details. |
To setup specific formats for a supplier:
Refer to "Adding a New Supplier" or "Updating a Supplier".
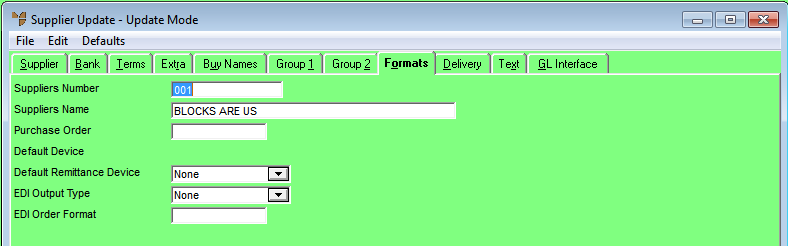
Micronet displays the Supplier Update screen - Formats tab.
|
|
Field |
Value |
|---|---|---|
|
|
Purchase Order |
Enter the name of the purchase order format that you want to use for this supplier. |
|
|
Default Device |
Select the default output device for purchase orders for this supplier, e.g. screen, printer, PDF file or mail file. |
|
|
Default Remittance Device |
2.8 Feature Select the default output device for remittances. For example, you can print to screen, printer, PDF file or various file and mail formats. For more information about these output types, see "Selecting the Output for Inquiries and Reports". If you select None, Micronet will ask the user when the document is printed. |
|
|
EDI Output Type |
2.8 Feature If purchase orders are to be sent electronically to this supplier, select the output type:
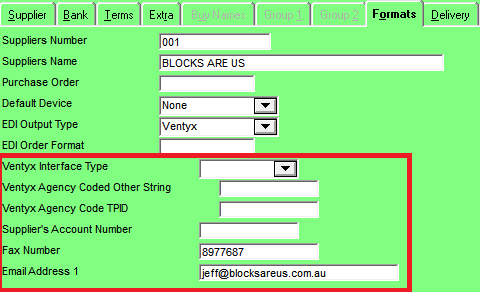
If you select Ventyx format or B2Be format, Micronet displays a number of new fields at the bottom of the screen. Note that Ventyx and B2Be work in exactly the same way; they are just different providers.
|
|
|
|
Technical Tip Note that you need to set up user defined questions (UDQs) for the first four fields outlined above – see "Entering User Defined Questions". |
|
|
EDI Order Format |
2.8 Feature If you selected Report Format as the EDI Output Type, enter the name of the purchase order format in which purchase orders are to be sent electronically. When a user selects FILE | POST AND CREATE EDI FILE on the Purchase Order Creation screen, the purchase order will be sent automatically in this format. (For more information, see "Purchase Order Creation - File - Post and Create EDI File".) |
|
|
Ventyx Interface Type |
Select the supplier's interface type as supplied by Ventyx / B2Be:
|
|
|
Ventyx Agency Coded Other String |
If you selected Integrated or Webview as the Ventyx Interface Type, enter the text/number supplied by Ventyx / B2Be. |
|
|
Ventyx Agency Code TPID |
If you selected Integrated or Webview as the Ventyx Interface Type, enter the supplier's TPID as provided by the supplier (and assigned by Ventyx / B2Be). |
|
|
Supplier Account Number |
Enter your company's customer number with this supplier, i.e. the number the supplier uses to refer to your company. |
|
|
Supplier Fax Number |
This defaults to the fax number entered on the Supplier tab (see "File - Supplier - Supplier"). If you change the fax number in this field, it will also update the fax number on the Supplier tab. |
|
|
Supplier Email Address 1 |
This defaults to the Email Address 1 entered on the Supplier tab. If you change the email address in this field, it will also update the email address on the Supplier tab. |
For more information, see "Supplier Update Screen - Menu Options".